Setup Microsoft 365 with Custom OAuth Client (Outlook)
This guide will assist you in connecting Office 365 to Confluence Server/Data Center using a custom OAuth client that you register in Azure. Most people that just want to connect to their office 365 account should use the standard option. This method is for organizations that want to use their own OAuth Client with code flow for security reasons. This is an expert option not needed for most customers.
Microsoft mandates the use of OAuth (modern authentication) for all applications. This guide assumes you have administrative rights in both Azure and Confluence. If you are not an admin, please coordinate with your organization’s admin to complete these steps.
Step 1 – Go to the configuration page
If you are not already on the configuration page of mailto.wiki, please navigate to the configuration page (refer to the Getting Started section for instructions).
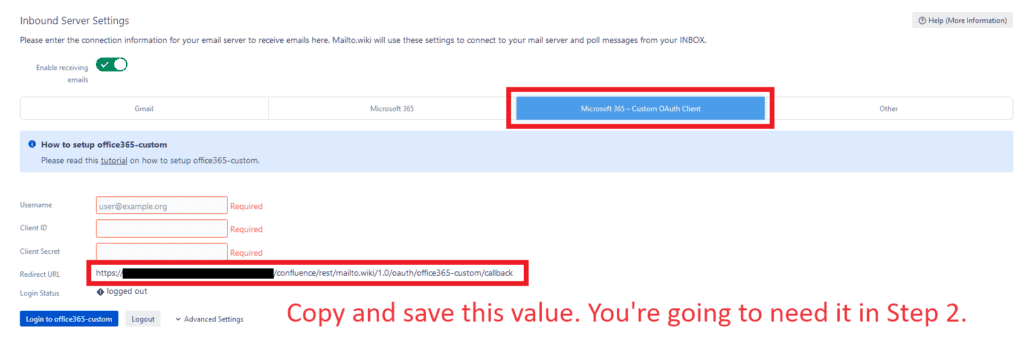
On the Inbound Server Settings or Outbound Server Settings section, click on Microsoft 365 – Custom OAuth Client. Copy and save the “Redirect URL”. You will need this value later in Step 2 when you create your OAuth2 client in Microsoft Azure.
Step 2 – Register a new OAuth Client in Azure
Before configuring mailto.wiki, you need to register your application in Azure to obtain OAuth credentials.
- Log in to Azure Portal: Go to the Azure Portal and log in with your Microsoft account.
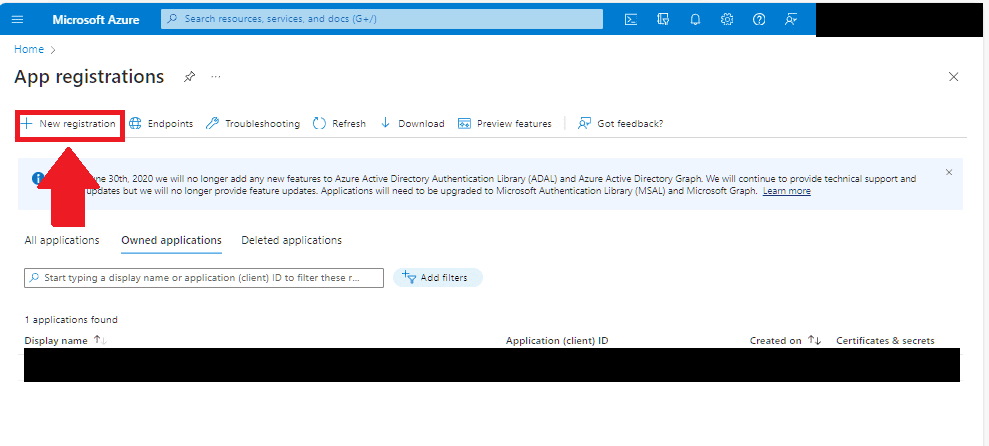
- Register a New Application: Navigate to App registration and click on + New Registration
- Configure the Application:
– Enter a name for your application.
– Select an account types option that includes the account you want to login with. If you don’t know that to choose here the default option Accounts in this organizational directory only is probably want you want.
– Under the redirect URI, select Web from the drop down and input the URL provided in the mailto.wiki configuration page (Step 1). This URL is vital for the OAuth flow. Make sure you didn’t accidentally copy any spaces.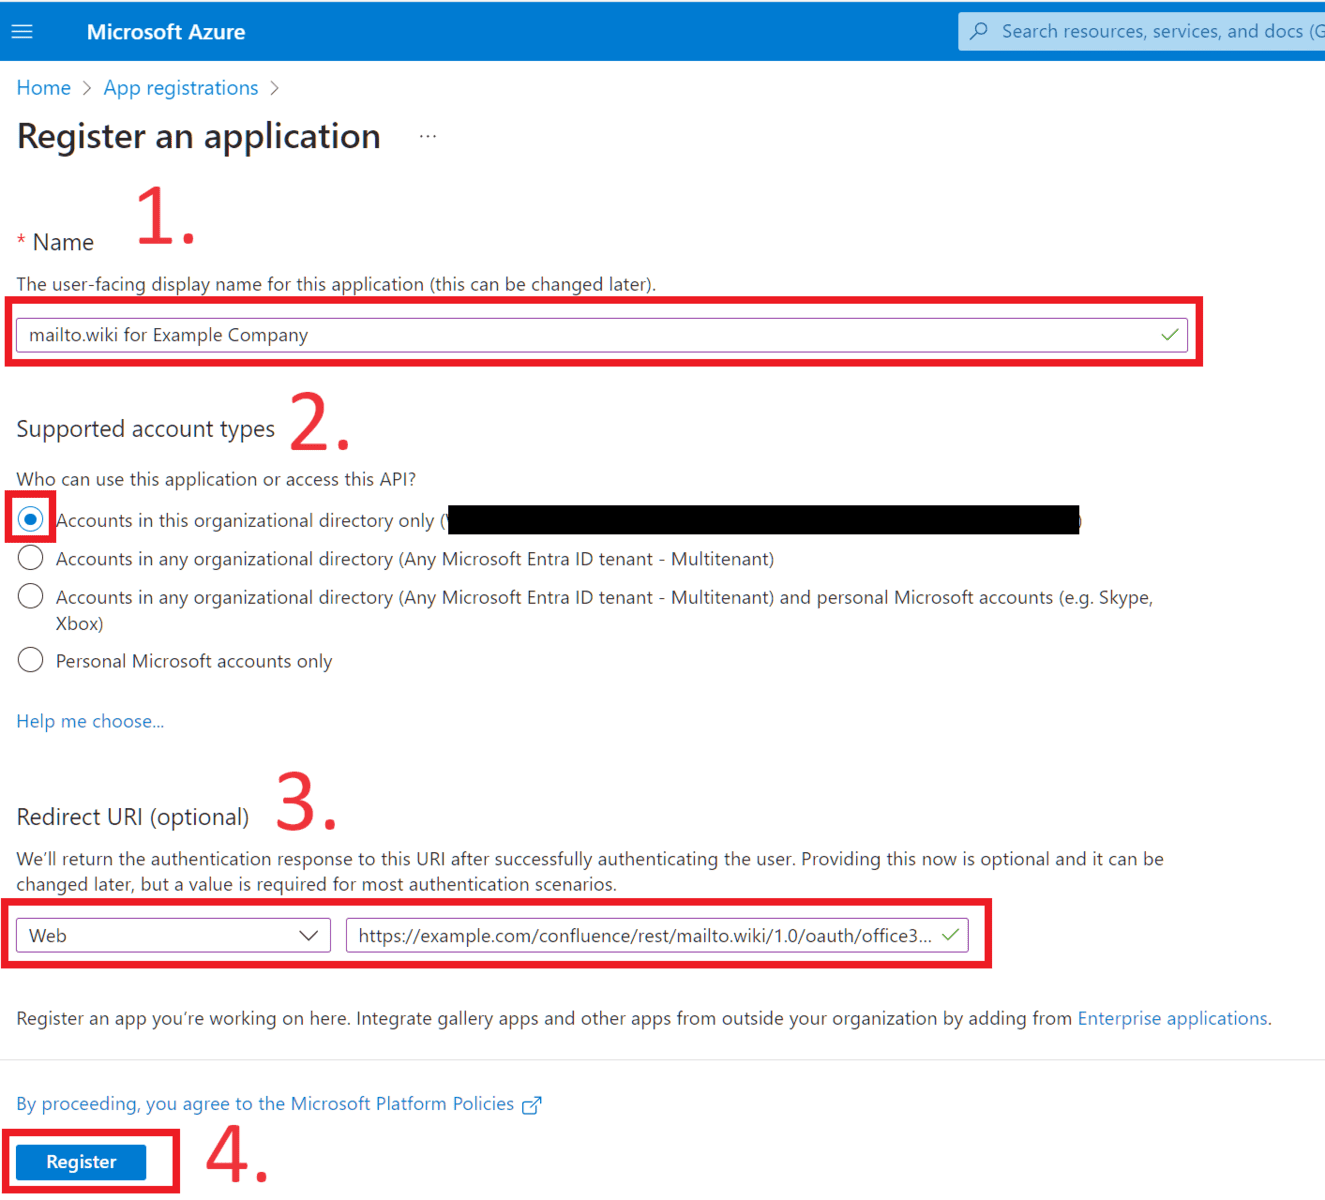
Step 3 – Get client ID and Secret for OAuth Client
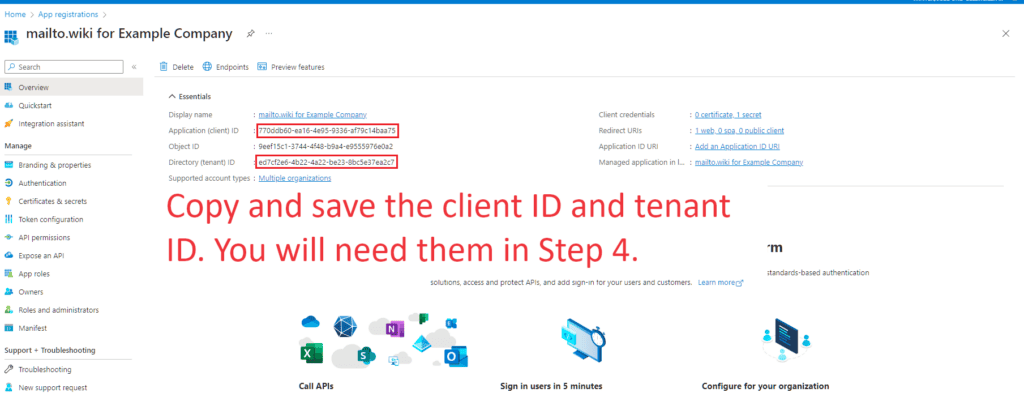
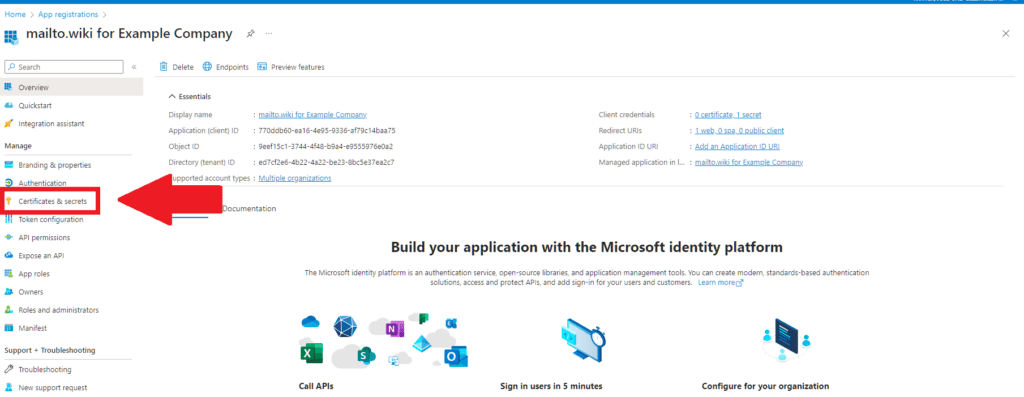
After creating your application you should be redirected to an overview page for your client.
Copy and save the Application (client) ID and the Directory (tenant) ID from that page, you will need it in Step 4.
Next go to the Certificates & secrets page by selecting it from the menu on the left.
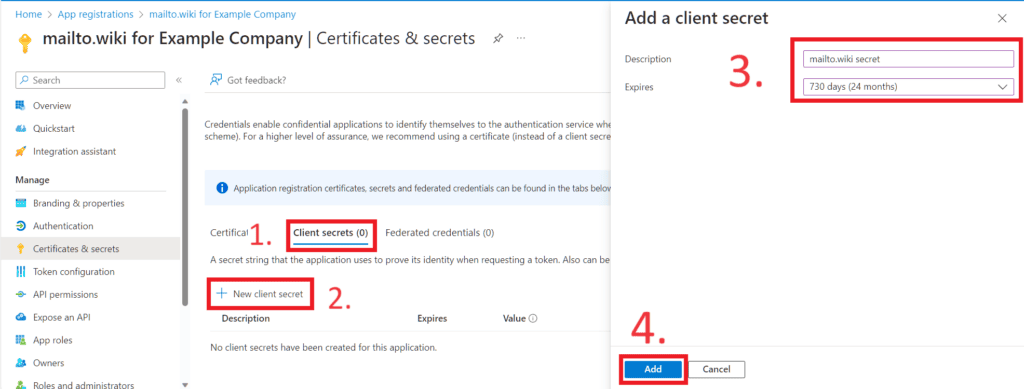
Then under Client secrets click on + New client secret. A dialog should open, follow the instructions to create a new secret.
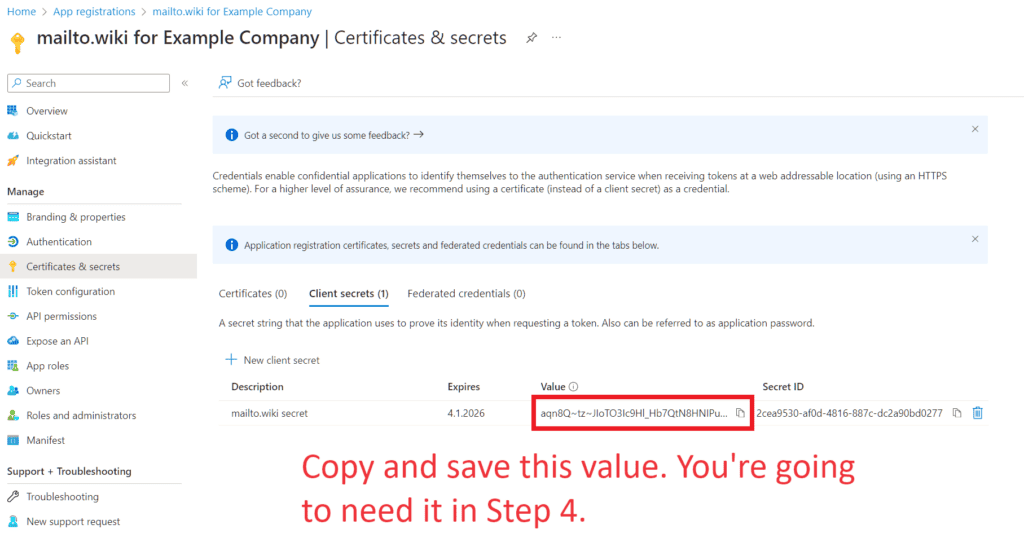
Next copy the value of the new secret under Value. You’re going to need it in the next step.
Step 4 – Connect Confluence with Office365
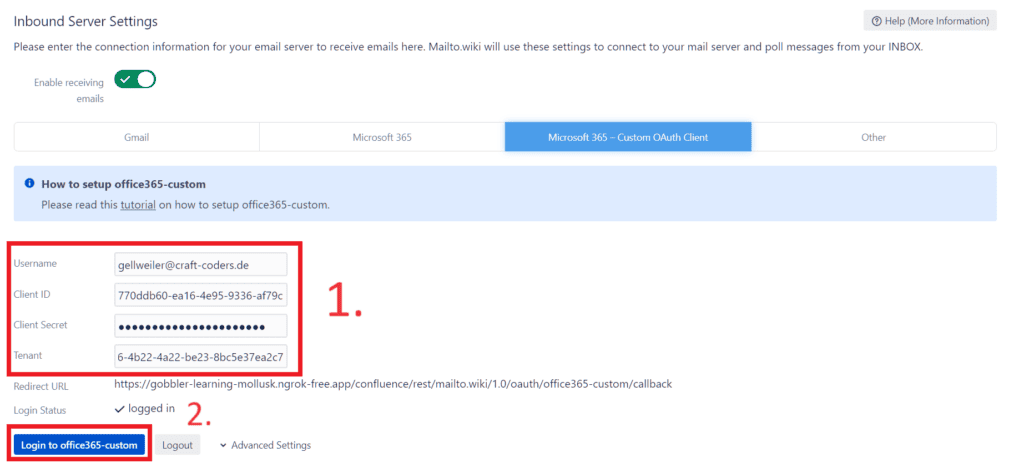
Now, go back to the configuration page of mailto.wiki (Step 1) and enter the username you want to use with mailto.wiki into the Username field.
Then you will need the information we obtained in the previous step. Put the Application (client) ID into the Client ID field. Enter the Value of your secret from step 3 into the Client Secret field. Also enter the Directory (tenant) ID into the Tenant field.
If you deviated from the default in Step 1 and choose Accounts in any organizational directory (Any Microsoft Entra ID tenant – Multitenant) enter organizations instead into the Tenant field. If you choose Accounts in any organizational directory (Any Microsoft Entra ID tenant – Multitenant) and personal Microsoft accounts (e.g. Skype, Xbox) enter common into the Tenant field. If you choose Personal Microsoft accounts only enter consumers into the Tenant field.
Finally, click on the “Login to office365-custom” button:
This will open a new tab or window in your browser displaying a“Sign in” dialog.
Log into your account.
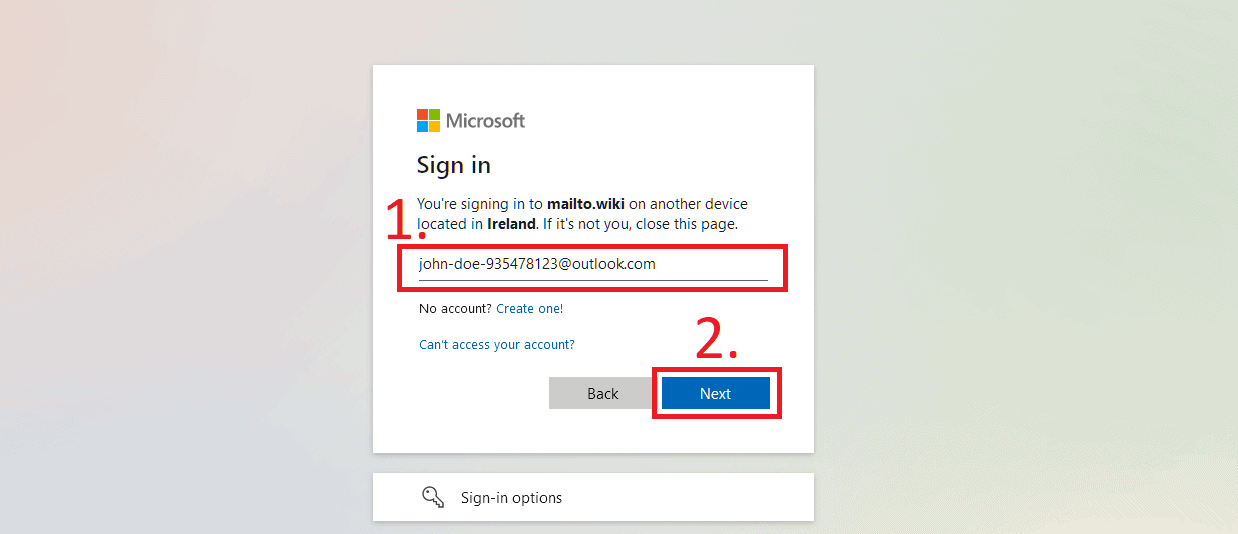
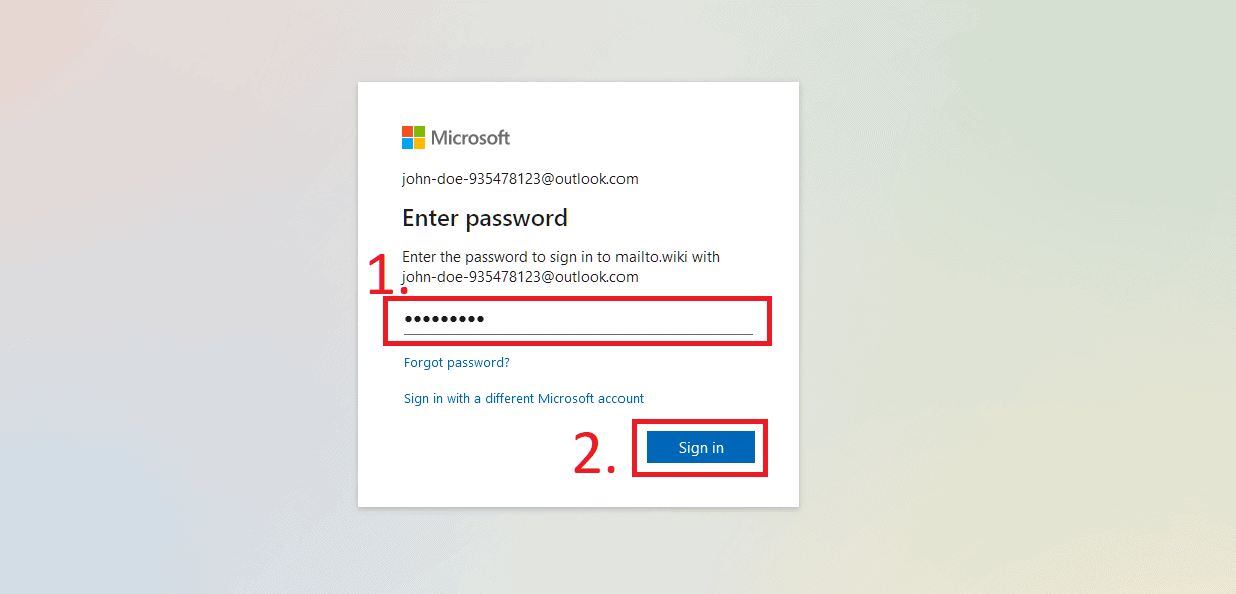
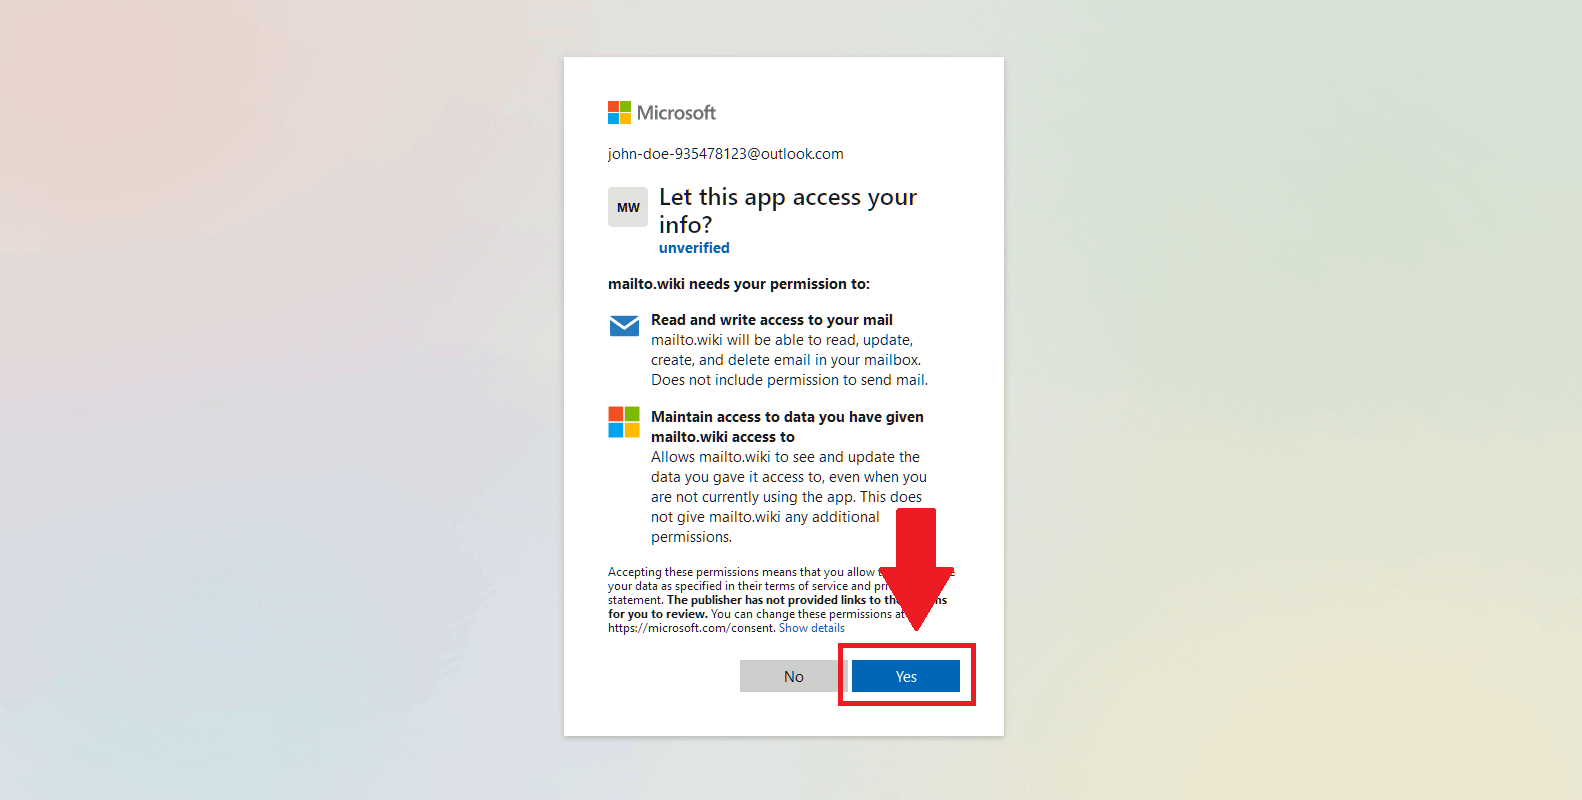
Microsoft will prompt you with a message asking if you want to grant mailto.wiki access to your mail account. Please confirm by clicking on “Yes”.
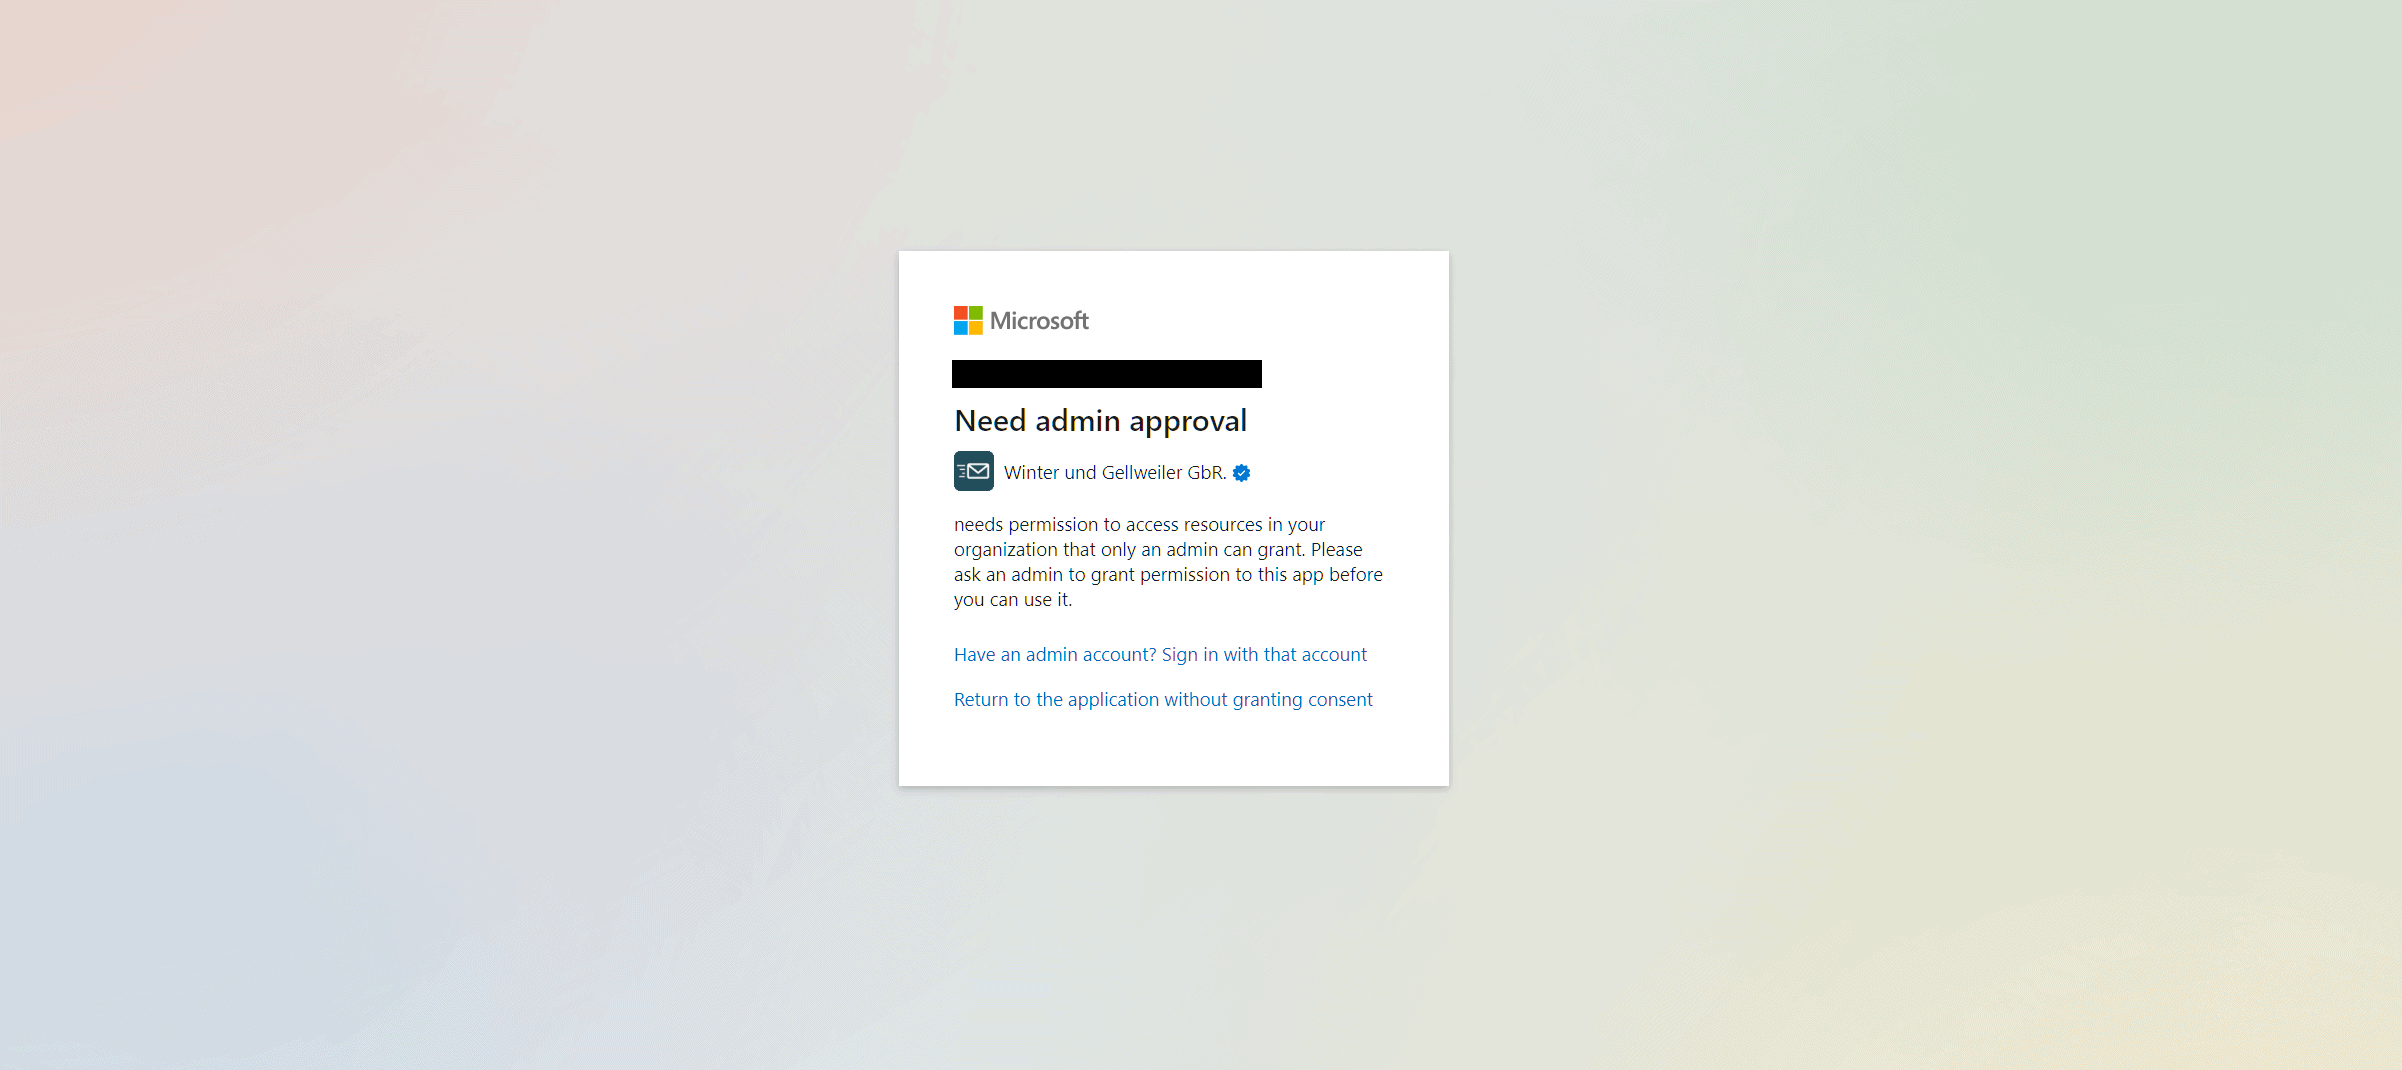
In some cases, instead of the “Let this app access your info?” screen, you may encounter a “Need admin approval” screen. If this occurs, please follow the instructions provided below. It’s also possible that you may not see this screen and are directly redirected to the “All done” screen. If that is the case, you can simply skip this step.
If everything went smoothly, after finishing the login process you should see a success message indicating that the connection with Office365 has been established. If you do not see this message or encounter any issues, please take a screenshot and contact support@mailto.wiki for further assistance.

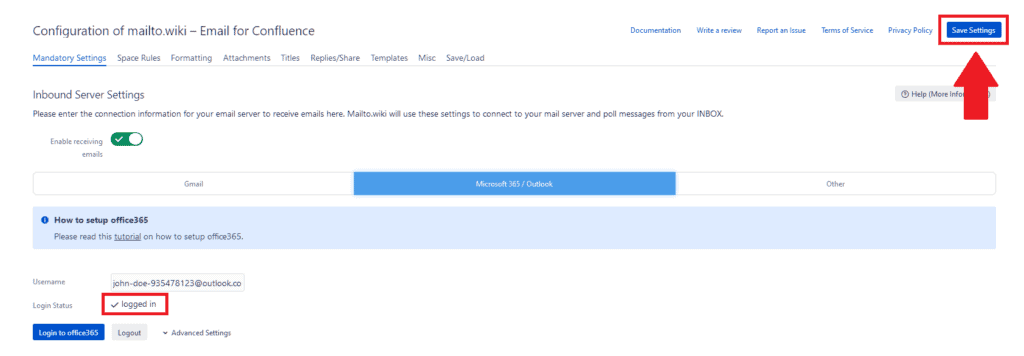
Finally, close the tab or window displaying the success message and return to the configuration screen. After waiting for about 10 seconds, the configuration screen should reflect that you are logged in. Don’t forget to save your settings by clicking on the “Save Settings” button.
How to Handle “Need Admin Approval”
During the setup process, you might come across a message titled “Need Admin Approval”. Encountering this message indicates that your organization must first approve the use of mailto.wiki. Only after this approval can you proceed to connect your mailbox to mailto.wiki.
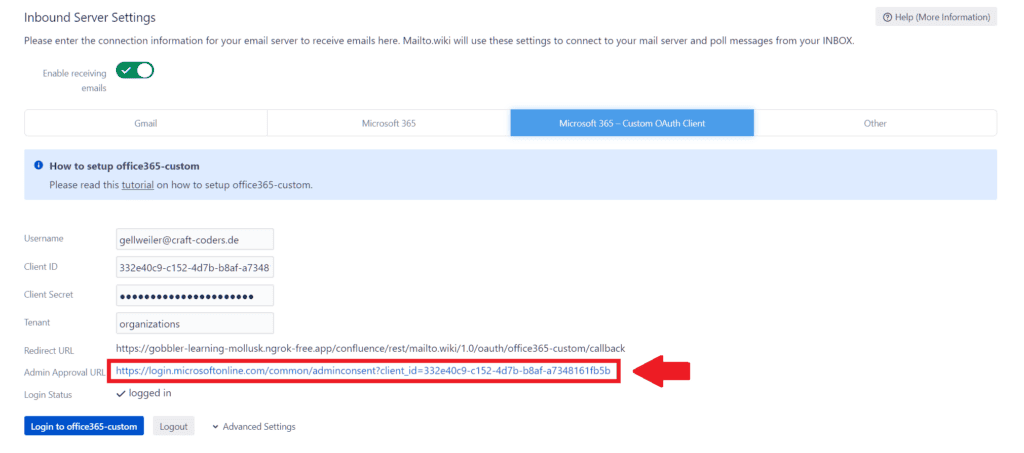
To resolve this issue, visit the Admin Approval URL referenced on the mailto.wiki configuration page and log in with an Office 365 admin account. If you’re not an Office 365 admin in your company, please send this link to one of your Office 365 admins and ask them to grant consent for you.
When visiting the link, you should see a “Permissions requested” screen. Click on Accept.

If all steps have been followed correctly, you will be redirected to a screen showing a success message:
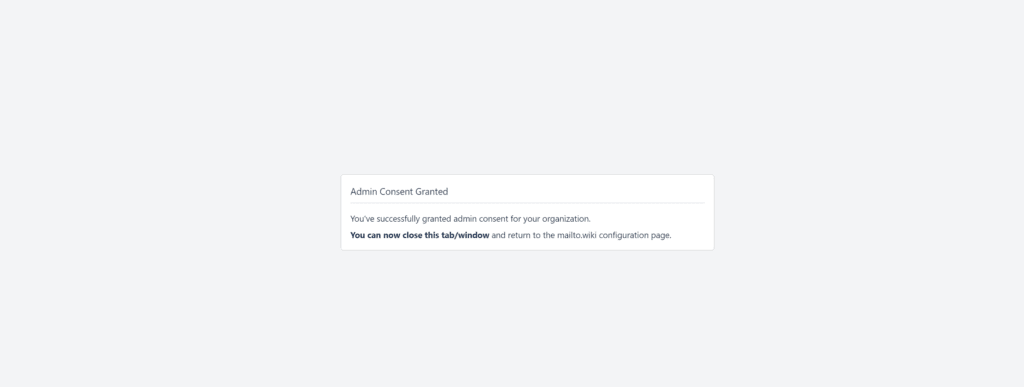
However, approval takes time to take effect, so please wait for 30 minutes. After waiting, initiate the login process again, and you should now be able to log in successfully.
Pitfalls to Avoid
Ensure the email address you’ve entered in the Username field is correct. If it’s not, mailto.wiki will not work, even if you’re logged in.
Remember to log in with the same account you entered in the Username field. If you’re unsure, please log out and then log back in.
A majority of issues can be resolved by simply logging out and logging back in.
Conclusion
You now understand how to connect Microsoft 365 or other Outlook online accounts with mailto.wiki. You can use the same account for both Inbound and Outbound Server Settings; just repeat the process. Note that after 90 days of inactivity or under certain circumstances, Microsoft will automatically log you out. If you suddenly stop receiving emails in Confluence, please return to the configuration page and ensure you’re still logged into your account.
Also you will need to manually update the client secret on the configuration page when the token is coming near its expiration date. So set yourself a calendar entry!
Should you experience any issues, don’t hesitate to contact us at support@mailto.wiki.

