Our add-on mailto.wiki allows you to Email for Confluence Cloud. If you have just started using the plugin and want to import a lot of existing emails into Confluence, this guide is for you. Mailto.wiki allows you to register your own email address ending in @mailto.wiki. Emails you send to this address will get automatically posted as pages or blog posts in Confluence.
You may think that you need to forward each email individually to your mailto.wiki address. This would be a real nightmare if you have a large number of emails to import. In this case, we have good news for you! You don’t need to forward every single email, you can easily do a mass import. This blog will show you how to perform such a mass import of emails from Outlook or Thunderbird into Confluence Cloud using mailto.wiki.
Disclaimer: We are the developers of mailto.wiki – Email for Confluence.
Setting up mailto.wiki
For this example we assume that you have already installed the mailto.wiki plugin, set up the mandatory configuration and have at least one valid @mailto.wiki address registered. If you haven’t, look at our documentation on getting started.
After you have everything set up on the Confluence side, you can establish a rule to perform a mass import of emails from Thunderbird or Outlook. To do this, we need to perform two steps in both email applications. We’ll start with Outlook. The step by step instructions for Thunderbird can be found below.
Outlook
1. Create a folder in Outlook where all emails to be imported will be stored
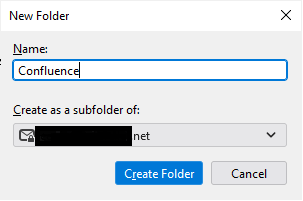
First, create a new folder in your mailbox to store all the emails you want to import into Confluence. To do this, right-click on the folder or account (leftmost column) where you want to create a new folder and select the New Folder option. We will call the new folder Confluence. Now move or copy all the emails you want to import into this folder.
2. Create a rule in Outlook
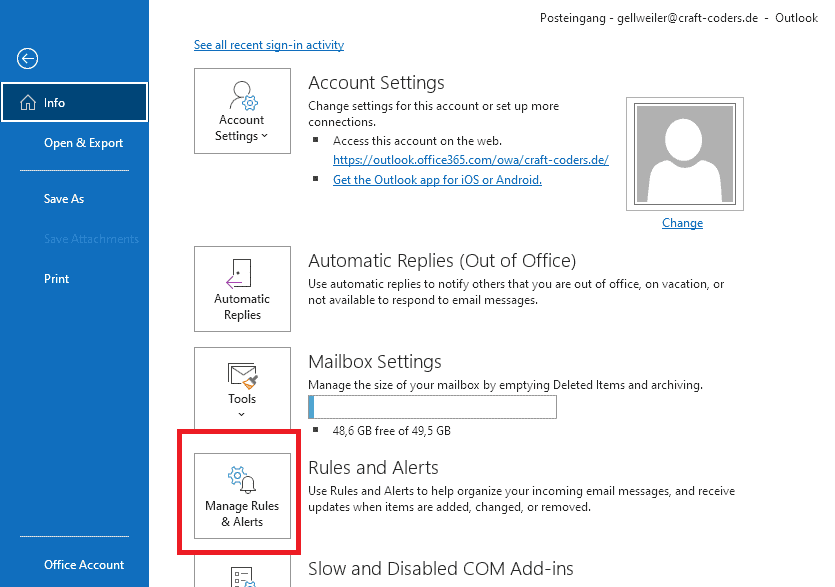
In order to create a new rule in Outlook you need to click on the tab File and then on Rules and Alerts.
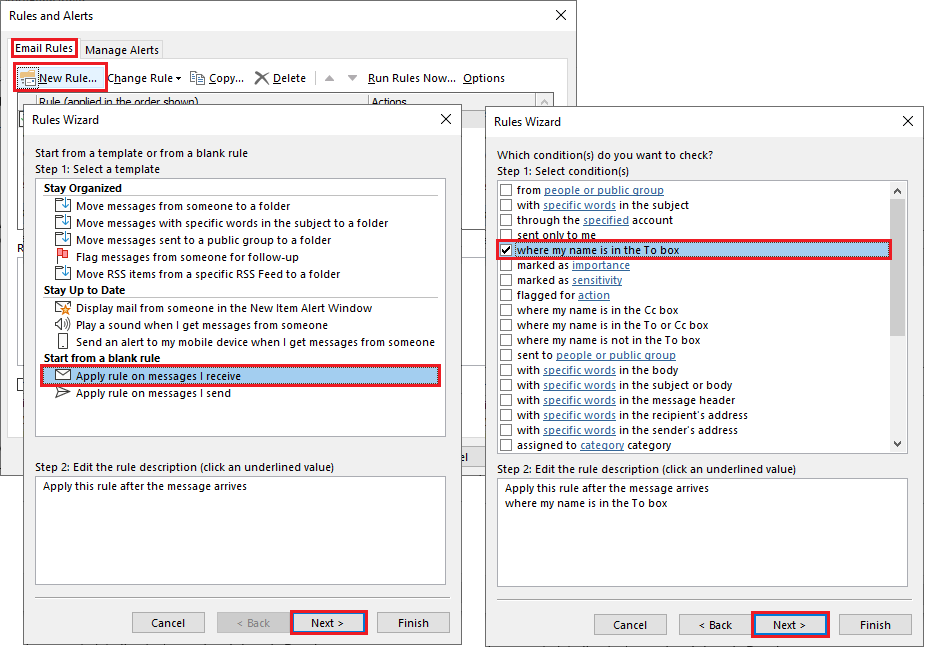
This will open the Rule and Alerts dialog. Select the Email Rules tab at the top and then click on New Rule. A new window will open where we can configure our rule. In the first step, you need to select Start from a blank rule → Apply rule on messages I receive. Then click on Next.
The next step is to set the condition. Choose where my name is in the To box. This is a workaround because Outlook forces us to use a condition. With this setting, all emails sent to this account will be included. Then click on Next.
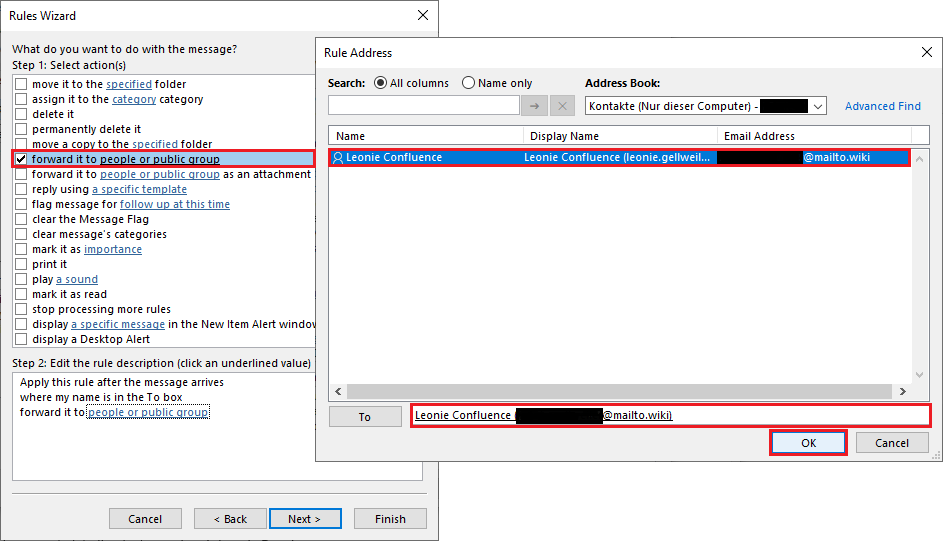
Now we can finally choose what we want to do with the messages. In step 1 we select forward it to people or public group.
In step 2, we need to further edit this selection by clicking on the linked words people or public group. A new window will open where we can then select a contact (our @mailto.wiki address) to forward the emails to. Once selected, double click on the contact so that it is transferred in the To row. Click the OK button to save the configuration and press the Next button in the Rules Wizard window.
In the next step, the Rules Wizard asks for any exceptions. Since we want all emails from the folder to be forwarded, don’t select any exceptions and just click Next.
Now you can give your rule a name. We have named the rule Import into Confluence. Don’t select anything for the Setup rule options and just click on the Finish button.
The rule setup is now finished and you can run the rule. Don’t select the rule and apply it using the Apply button, as it is currently true for all incoming emails regardless of the folder. Instead choose the option Run Rules Now on the upper right corner of the Rules and Alerts manager.
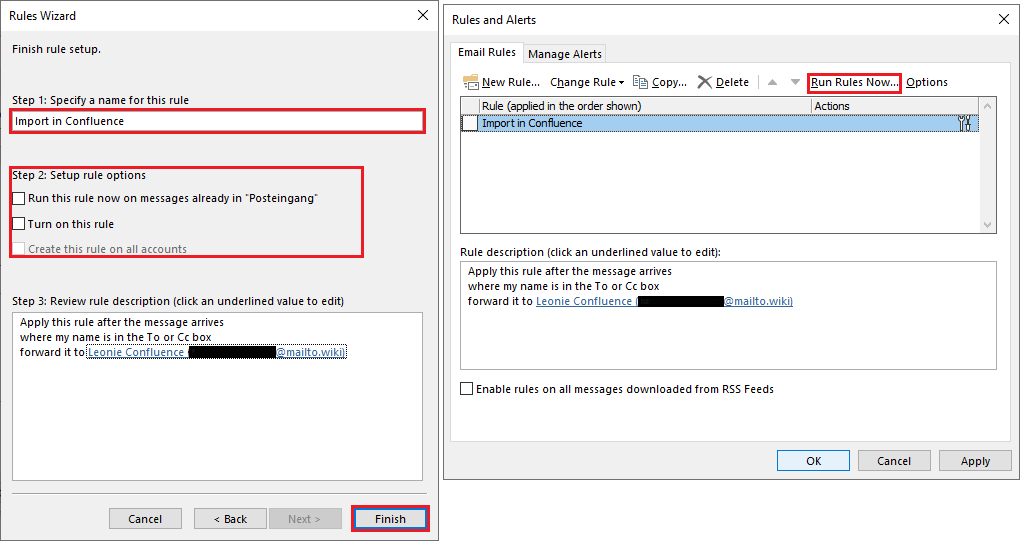
A new window will open where you select the Import into Confluence rule and choose the Confluence Folder as Run in Folder. In the field below select Apply rules to: All Messages. Then hit the Run Now Button. As a result, all emails in the Confluence Folder will be send to your @mailto.wiki adress.
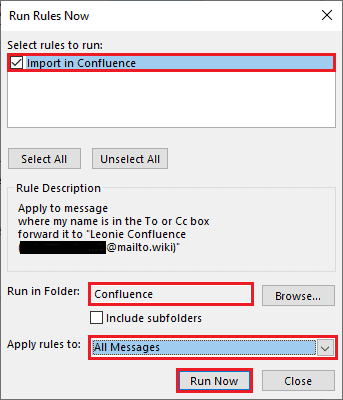
Keep in mind that this rule is manually executed. If you add new emails to the folder after applying the rule, the emails will not be automatically forwarded. Also, with the current setting, all emails will also be forwarded again when you re-run the rule for the folder.
Thunderbird
1. Create a folder in Thunderbird where all emails to be imported will be stored
First, create a new folder in your mailbox to store all the emails you want to import into Confluence. To do this, right-click on the folder or account (leftmost column) where you want to create a new folder and select the New Folder option. We will name the new folder Confluence. Now move or copy all the emails you want to import into this folder.
2. Create a rule in Thunderbird
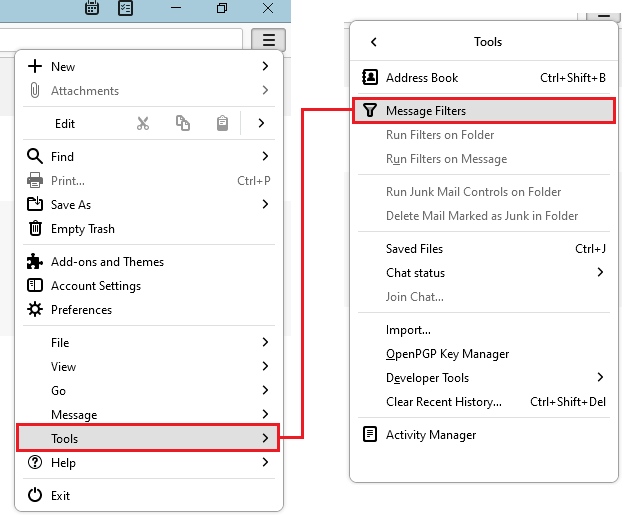
In order to create a new rule in Thunderbird you need to click on the hamburger menu on the top right corner and then choose the menu option Tools. A new submenu will pop up, here you choose the second tab Message Filters. Note that depending on the version of Thunderbird the path to create a rule may look slightly different.
Now the Message Filters rule window opens. First select for which email account you want to create a rule for and then click the New button on the right side. A new window will appear where you can configure your rule.
We’ll name our rule Emails to Confluence and select Apply Filter When → Run Manually. We don’t need a condition, so select the Match all messages option.
At the Perform these actions: line, you need to select the Forward message to option and then add our @mailto.wiki address. Don’t forget to save your configuration by clicking on the OK button.
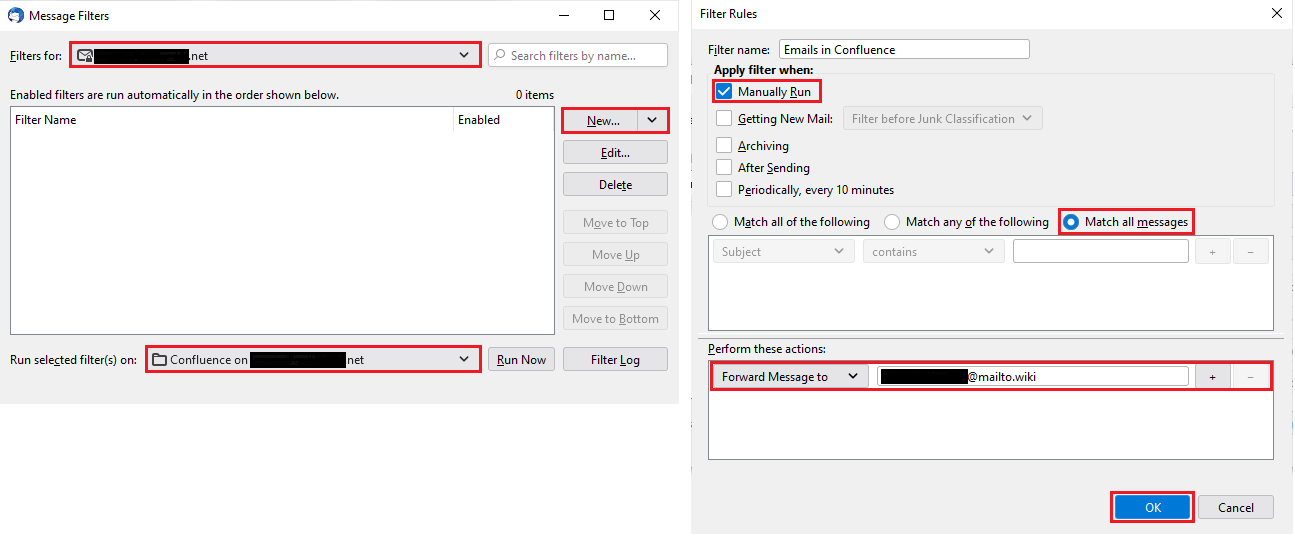
The last thing you need to do is apply your filter rule to the desired folder. To do so, go back to the Message Filters window and activate the filter rule you just created by clicking the checkbox next to it. Then select the previously created folder as Run selected filter(s) on: and finally press run now. We did it, any email saved in the Confluence folder will be forwarded to your @mailto.wiki address and therefore get imported into Confluence.

Keep in mind that this rule must be manually executed. If you add new emails to the folder after applying the rule, the emails will not be forwarded automatically. Also, with the current setting, all emails will also be forwarded again when you re-run the rule for the folder.
Conclusion
The combination of Thunderbird/ Outlook and mailto.wiki allows you to perform mass email imports into Confluence using filter rules. Filter rules are generally great for a lot of automation in your mailbox and also for the automation of incoming emails in Confluence through mailto.wiki. If you want to know more about the rule options of our add-on have a look at our documentation about space rules.
If you have any questions regarding our add-on or this blog don’t hesitate to contact us by email at support@mailto.wiki or via the Service Desk. We always like to hear about suggestions for improvements.